User authentication flow with TEOS Authentication service and TMS
User authentication flow description
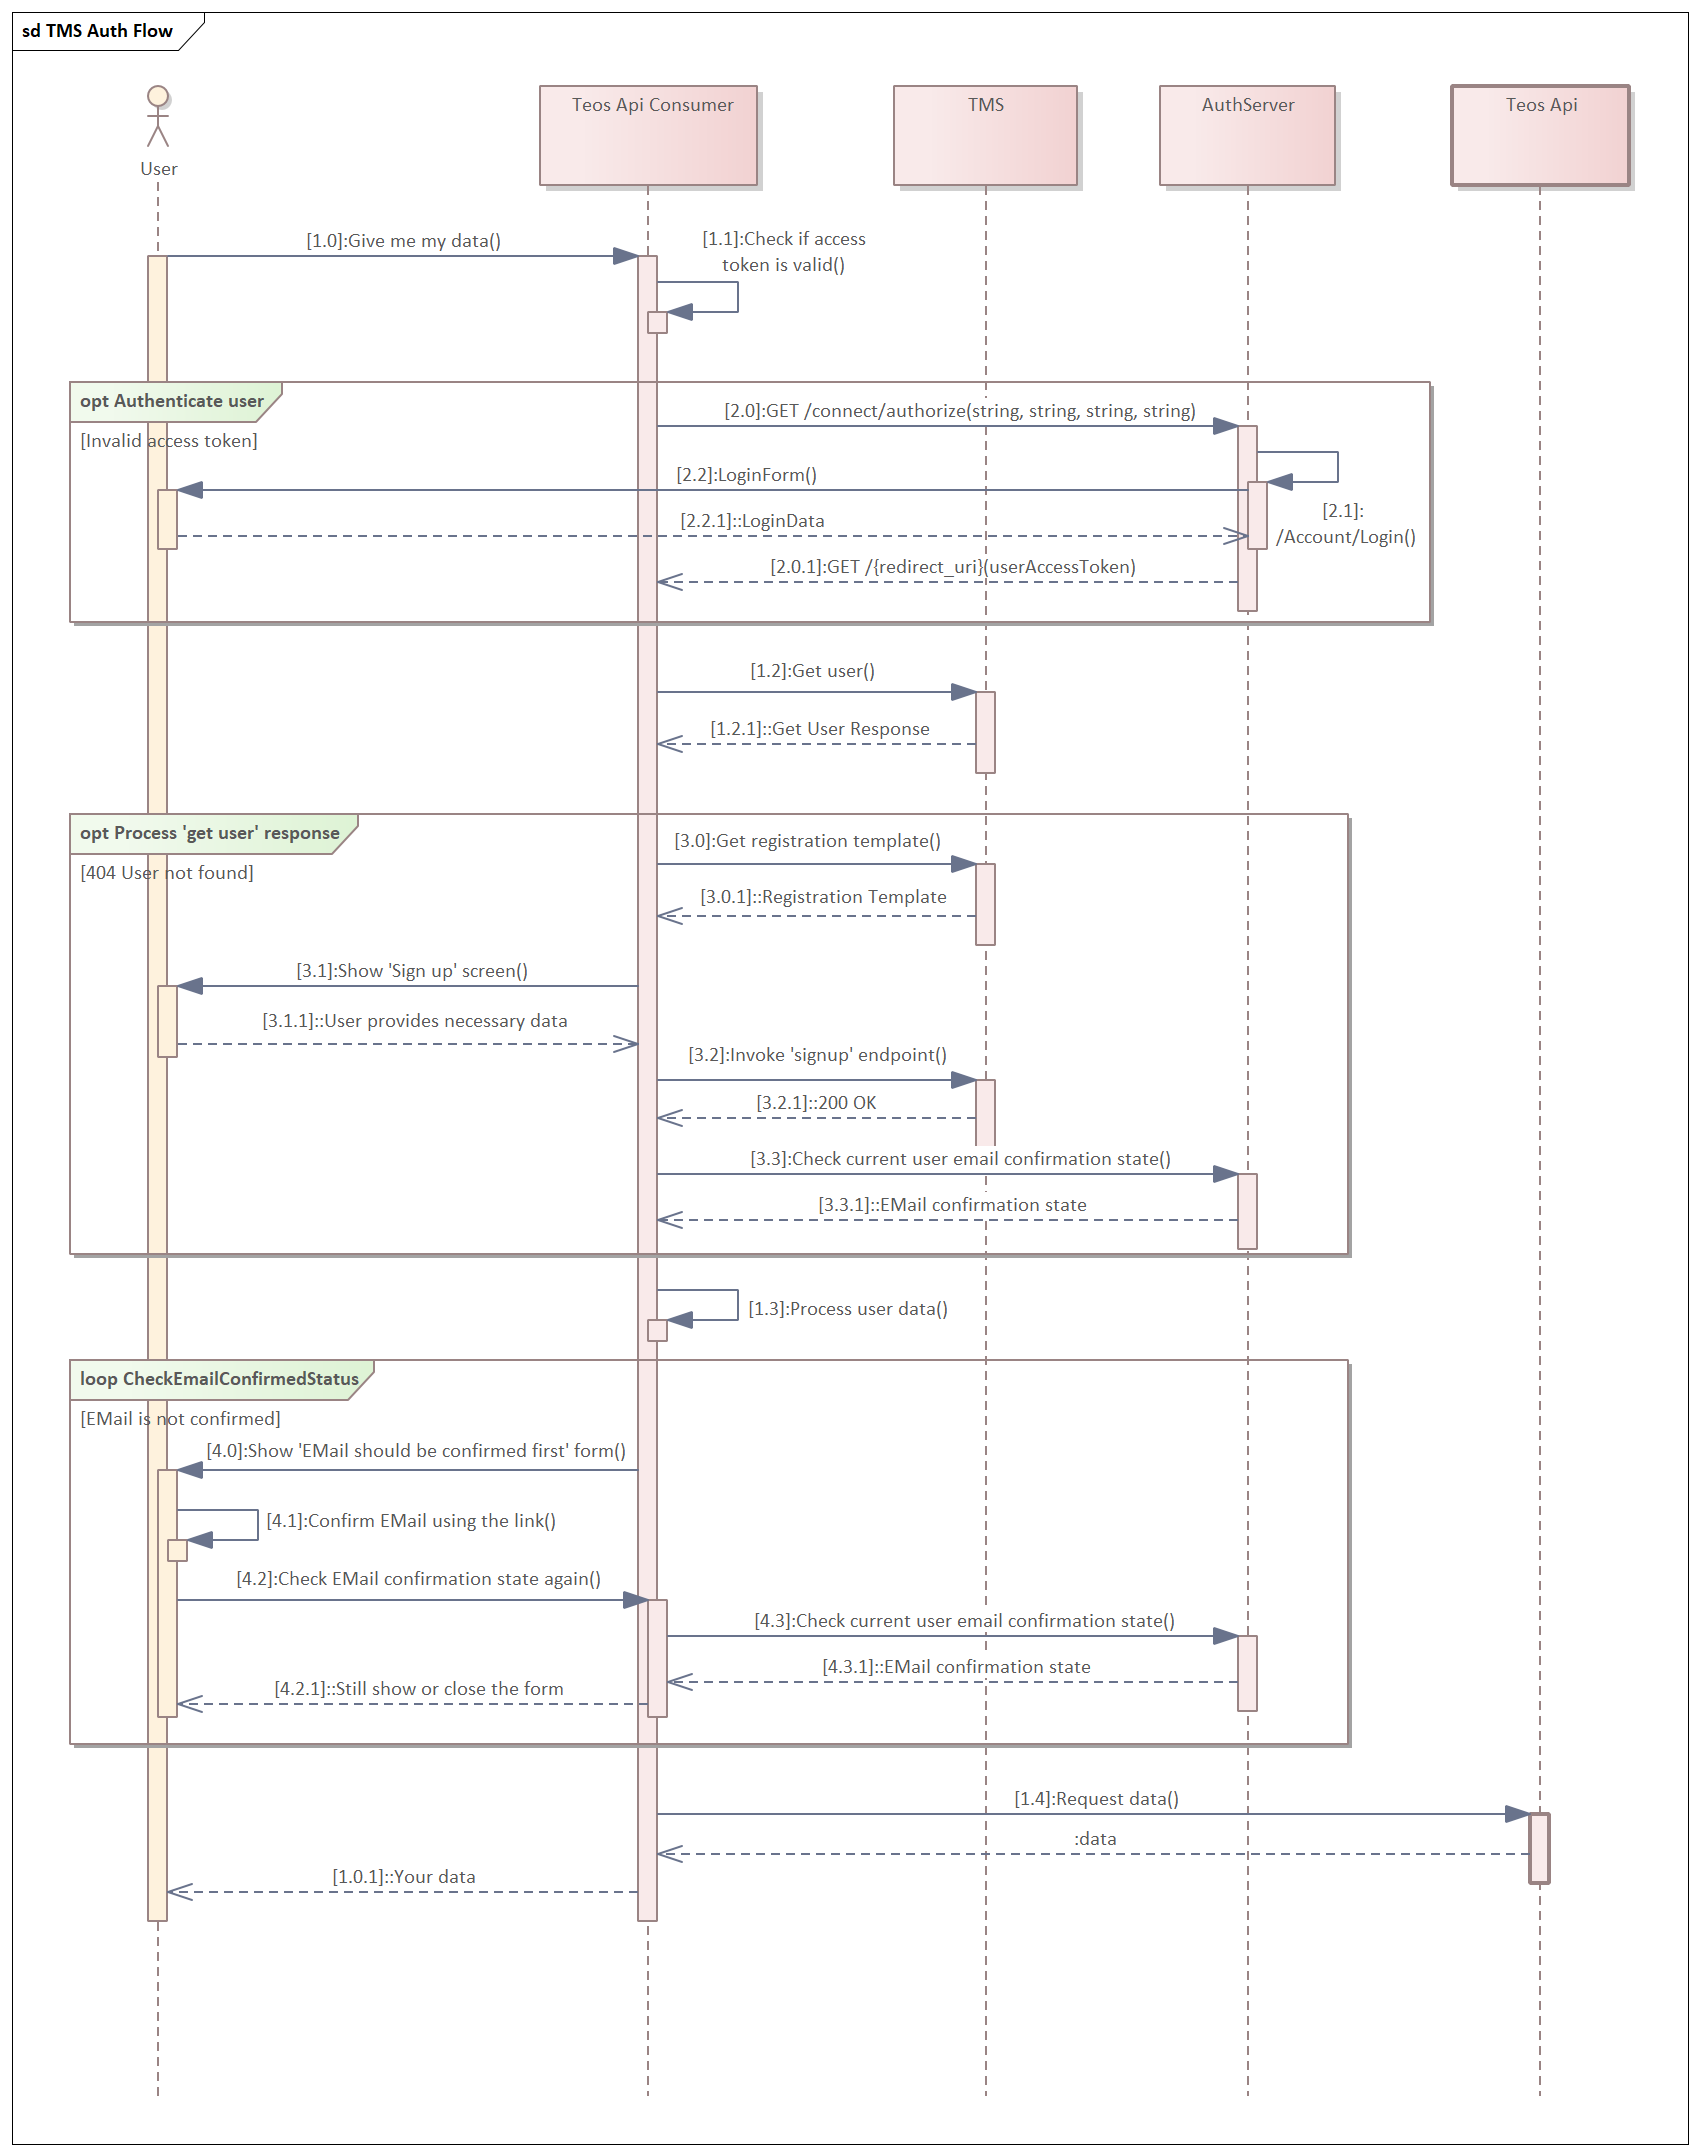
The following diagram describes the typical request flow from an authentication/authorization point of view. You can find a detailed description of each step below.
The [..] constraint notation on the diagram was used to number the steps. The numbering approach is similar to the communication diagram.
⤵️ Step 1.0. User executes any action that triggers a request to TEOS API.
Step 1.1. Application must check if the user access token is valid (present and not expired) (exact implementation is application-specific and is out of the scope of this document).
If the access token is not valid, the application should authenticate a user and retrieve a new access token from the auth-server (steps2.0)
Optional process. Authenticate user
Step 2.0. If the user access token is expired, then it is necessary to reauthenticate. The user authentication process should be started from the call to Authorize endpoint of the Auth server.
Step 2.1. If the validation of the calling application and all parameters to the Authorize request is successful, the Auth server will return the login form, configured according to the white-labelled settings of the calling application.
Step 2.2. The application should present the returned login form to the user in the browser pop-up window
Step 2.2.1. The user provides login and password or uses another federated login method (e.g. Facebook or Google)
Step 2.0.1. Auth server authenticates the user and in case of success, redirects the browser back to the app (to the redirect URL, provided in Step 2.0) with the requested user access token and the ID token (if configured)
Please refer to Authentication Typesthe for more details about the authentication types.
Step 1.2. Application sends a request to the /users endpoint in TMS to retrieve information about the authenticated user:
Step 1.2.1. Application processes response from 1.2.
Please refer to Using TMS API to learn more about the endpoint request and its response.
Step 1.2.1. Application processes response from 1.2.
If the response HTTP status code is 200, the response body will contain user data in the response body (see step 1.3).
If the response HTTP status code is 404, this means that the user was created in auth-server, but was not created in the customer's tenant. The application must initiate tenant-user creation (Optional process. Get user data, steps 3.0-3.2)
Optional process. Get user data
Step 3.0. Application calls /templates endpoint:
The response body will contain the information about the registration template for the customer's tenant: {"ReferralCodeRequired": true}. This data must be used in the next step.
Please refer to Using TMS API to learn more about the endpoint request and its response.
Step 3.1. Application shows the 'signup' screen for a user. This screen should provide the user with the possibility to fill in the referral code.
Step 3.1.1. User fills in the necessary data and submits his request.
Step 3.2. Application calls the 'signup' endpoint in TMS:
All the fields except for "referralCode" are optional and may be omitted (default values are shown in the example request).
If response in the step 3.0 contains {"ReferralCodeRequired": true}, then POST /users/signup must contain valid value of "referralCode". If "referralCode" is missing or incorrect, corresponding error will be returned.
Please refer to Using TMS API to learn more about the endpoint request and its response.
Step 3.2.1. TMS responds with the created tenant-user's data in the response body (see next step). Here the application user profile can be created, if necessary
Step 3.3. This step is optional and intended to get the latest state of email confirmation during the signup process as at this moment the user could have already confirmed his email and process 4.0 is not necessary. Please refer to the Using TEOS Authentication service Specific endpoints to know the details about GET /api/User/emailvalidated call.
Step 1.3. Based on the application logic, the application may process the user data, retrieved in steps 1.2 or 3.2.1 (exact implementation of user-data processing is application-specific):
During this stage, the user's E-Mail address confirmation state can be checked (or in any other place later). It should be retrieved from the identity claim 'email_verified'. This approach is quick and if the claim states that the E-Mail address is confirmed, it means that to the token introspection moment the E-Mail address was confirmed. When it is required, that the E-Mail address is confirmed, but it is not, the optional process Check email confirmation state within steps 4.0 - 4.3 can be engaged.
User can have one of the following states:
Unconfirmed = 1 - User has never confirmed the email address (❗this status is deprecated and will be removed soon, the identity claim 'email_verified' must be used to get info whether email is verified by the user)
Confirmed = 2 - User has confirmed the email address (❗this status is deprecated and will be removed soon, the identity claim 'email_verified' must be used to get info whether email is verified by the user)
Approved = 3 - User's request is approved by tenant administrator
Rejected = 4 - User's request was rejected by tenant administrator
Disabled = 5 - User was disabled by tenant administrator
Optional process. Check email confirmation state
Step 4.0. The form, showing the necessity to confirm the address is returned to the user. There should be a button to retry the confirmation state check.
Step 4.1. User retries to confirm the E-Mail address.
Step 4.2. User clicks the button to retry the state check.
Step 4.3. The application should normally cache the user access token introspection results and not call Auth Server introspection for each own request. It degrades the performance of the application and will lead to throttling bounces from Auth Server. Instead, for special cases, like this, there is a special endpoint, returning actual E-Mail address confirmation status. Please refer to the Using TEOS Authentication service Specific endpoints to know the details about GET /api/User/emailvalidated call.
Step 4.3.1. The previous call will return the response including "EmailValidated" flag value.
Step 4.2.1. Depending on the actual E-Mail address confirmation state the application can show the update on the form or even terminate the session.
Step 1.4. Application sends the request to TEOS API.
⤴️ Step 1.0.1. The application shows the user a screen with the requested data.
Last updated
Was this helpful?